Getting started with technologies these days is easier than ever since there are plenty of introductory articles and most technology providers will keep dedicated teams for writing and keeping up-to-date technical documentation with titles such as Getting started with xxxx. 10 minute intro to xxxxx, Quick intro to..., etc. Terraform is no exception to this and they have great entry level documentation here:
Although the Terraform documentation is top quality after reading it you still feel like you’re just grasping the surface and there’s lots of complex, enterprise-level scenarios that are unclear.
People have different learning styles but for me my preference is learning lessons by a mix of theory and practice (I am a big fan of all books finishing by ...in Action) and therefore this article will be the first of a series of articles using different use cases that expose best practices within Terraform by example and will progress in complexity from one use case to another. The first use case that will be covered is the definition of a blog site using serverless technologies in AWS.
My goal is to answer the following questions by the end of this article:
- How do we define modules that are reusable by a team in Terraform?
- How do we separate the IaC (Infrastructure as Code) between different environments while achieving DRY?
It is worth noting that IaC is after all code and the best coding practices that have been refined over the years for software systems are also applicable to IAC. - What are some general Terraform tips and recommendations?
Before proceeding let’s define terraform and its relevancy within the DevOps universe.
On the subject of DevOps my personal opinion is that it is one of the best coined buzzwords that I have encountered throughout my career. There are a LOTS of buzzwords in the IT industry and most are very unclear and confusing such as Microservices, Digital Transformation, Web 2.0, etc. However, the word DevOps is actually very rich semantically and contains the core meaning in the word itself: “a better collaboration between Developers and Operations teams”, in some cases it can end up being the same person or team doing both. It is very important to clarify a KEY element here which is the development aspect in DevOps. This movement hugely embraces development as the automation element and therefore brings a lot of Software Engineering elements to the hardware and infrastructure world.
Terraform is an IaC (Infrastructure As Code) tool that takes care of provisioning an Infrastructure. Provisioning in layman’s terms means to bring infrastructure resources to life. Terraform uses a declarative programming paradigm and tracks the state of the resources that you declare using a yaml-like syntax created by Hashicorp (this is the company behind Terraform) called: HCL (Hashicorp Configuration Language). The most interesting aspect here is that as a user of Terraform you don’t need to worry about HOW to arrive to a specific state, instead you just have to worry about the WHAT and terraform does the rest.
There are 3 main states that terraform has to deal with:
- Current known terraform state (represented by a .tfstate file)
- New desired state (represented by the .tf files)
- Actual infrastructure state (represented in the provider’s actual environment, ex: AWS)
Terraform’s typical execution lifecycle will compare these 3 states and identify the required changes to achieve the new desired state. These changes can be of 3 types: Create, Add, or Modify resource(s). Note that a key element of terraform is a CLI tool that supports multiple commands to query your infrastructure, modify it, calculate the differences between the terraform state and the infrastructure state, represent the terraform state visually, etc.
A key notion to consider is that of drift which is the deviation of your infrastructure state from the one that Terraform is tracking. Drift can happen for example when a user modifies a resource outside of terraform using a UI (e.g the AWS console). Terraform does its best to deal with drift so as part of its flow it identifies changes between the known and desired terraform state and the real infrastructure state and decides on the actions to take. Note that from terraform’s point of view its end goal is the new desired state, so it will identify any actions required to bring the infrastructure to the desired state. This means that modifications that took place outside of terraform can be lost if they’re not specified in the desired state.
The high level requirements of the problem that we intend to solve for this article are the following:
- We want to create a public website for a personal blog
- The blog should support articles to be written in markdown language to facilite the creation and modification of content to people without a strong html+css+javascript background
- The blog should be as cheap as possible to run and maintain (by cheap I mean less than $5 CAD/month)
- The blog should support templates to render content consistently across different blog posts and blog pages
- The blog should start simple -just as a read-only blog- but support evolution with new features such as comments, comment approvals, etc.
- The blog should support a staging environment where correct display and rendering can be tested and shared without being accessible by the general public
- The blog content should be accesible using https
- The blog response times should be fast and scale automatically whenever there’s more views
- The blog should support proper rendering in different screen sizes ideally with availability of templates that use responsive design
The chosen technology stack that satisfies the above requirements is:
- IaC Provisioning tool: Terraform
- Hosting platform for the blogging website: AWS S3
- CDN for the blogging website: AWS Cloudfront
- Blogging platform: Hexo
Note: The goal of this article isn’t to justify or explain the rationale behind the chosen technology stack, for example there are other great tools to manage blogs or to publish static websites out there (Wordpress, Jekyll, etc.) that can also possibly satisfy the given requirements.
Before proceeding with the detailed solution it is worth mentioning that all of the code used for this article is available in github.
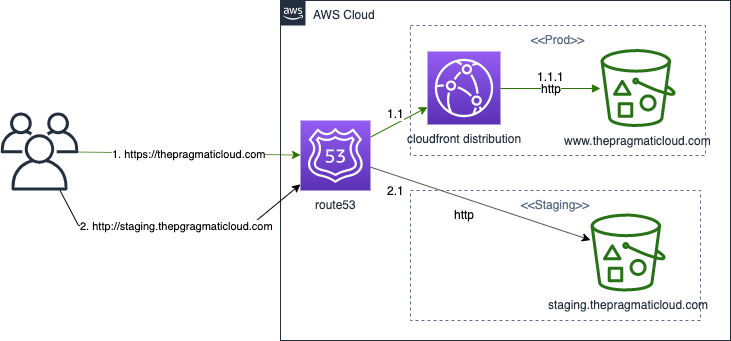
For the visually inclined (like myself!) here is a diagram of the infrastructure:

The chosen solution has 2 main parts:
- The infrastructure provisioning
- The content of the static blogging website that will run in the AWS infrastructure
This article focuses only on the infrastructure provisioning part, however I added some relevant links to the blogging tool (Hexo) at the end of this article.
Terraform Folder Structure
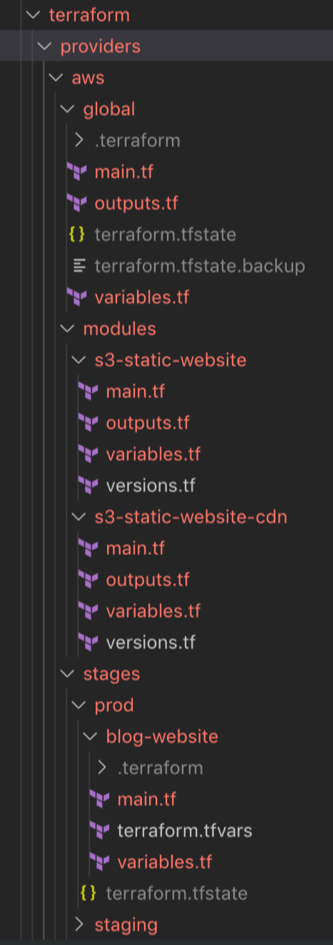
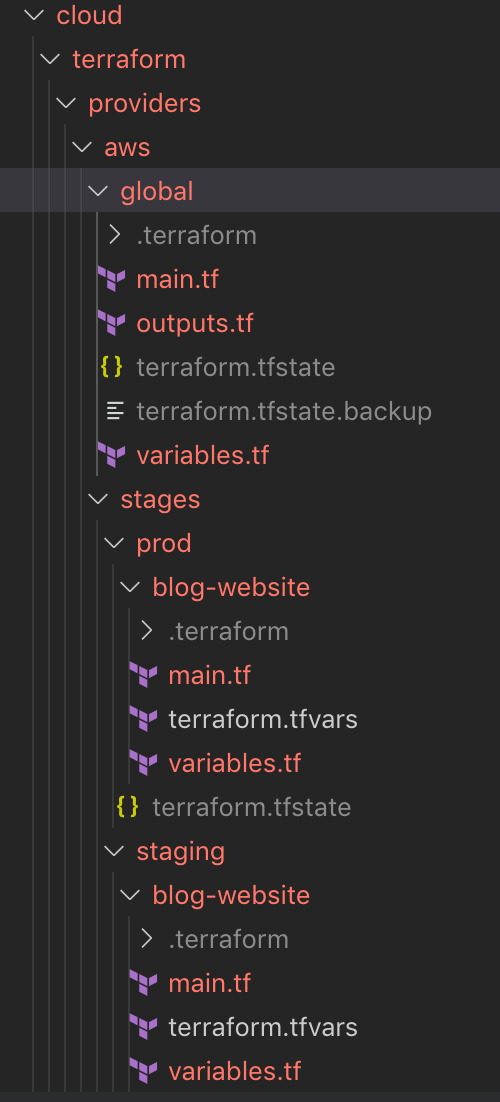
One key aspect before starting with terraform code is to define the folder structure for it inside of your preferred VCS (In our case we’re using git and github). The following diagram illustrates the folder structure that I created initially for this project and the final state after doing some module refactoring.
| Cloud Folder Structure Before | Cloud Folder Structure After |
|---|---|
 |
 |
I like managing products in a monorepo and inside I tend to have a folder named: cloud where I put all the IaC related to provisioning. It helps me a lot when my folder structure clearly maps to my cloud tooling, environments and modules. Inside the cloud folder there’s a subfolder for terraform…providers…aws. Note that a product or system can have multiple providers but in this case we only have aws. Under aws I like to separate my resources at a high level between the ones that are global (by global I mean shared across all stages or environments) and the ones that are specific to each environment. Sometimes the notion of fully global resources may not be present, for example if your company has a completely different AWS account for each environment. (This is a subject for another discussion altogether but in enterprise systems I highly recommend to use at least 2 different AWS accounts: one for production and another one for non-prod).
In this case -since this is a very simple personal blog- I decided to only use one AWS account and therefore under global I am keeping the common terraform remote backend resources which are comprised of the S3 bucket that stores the terraform state as well as the dynamodb table that prevents multiple users from modifying the terraform state at the same time (via terraform state locking).
There’s also only 2 stages for this specific project: prod and staging. It is a very common practice to have slight differences in environments. For example, if for a specific use case you required an AWS RDS Cluster with an instances class of db.r5.24xlarge (which costs around $11.52/hour) you probably would want to use something smaller and cheaper for your dev environments! Also, there can be resources that you probably don’t require at all in a specific environment. For this case I purposedly decided to use a CDN with AWS Cloudfront for the prod version of my blog but for the staging version I decided to only use an S3 bucket where I can verify the rendering of my blog before pushing everything to prod.
One last and very important folder level by environment is representing each terraform “layer” (These represent a logical breakdown of the infrastructure parts that a system or product is made of). Let’s say that my blog starts becoming more complex and eventually I decide to introduce a relational database to support comments in my blog posts. In this case I would create another folder for the networking layer of my product and another folder for the database layer of my product. The reasoning behind this is to be able to separate the different states of different layers of a product to avoid unnecessary risks when modifying infrastructure or if you want to use a better expression: “To reduce the blast radius” of errors.
Our folder structure for the above hypothetical scenario of adding a relational db would be something like this:
1 | - prod |
I believe that we can all agree that the change frequency of the vpc and relational-db will probably be much less than that of the blog-website so instead of modifying a centralized terraform state it is better to just modify the terraform state associated to the layer of the product that changed. When you have separate states you also will have to make sure that changes are run in the correct order and that you can reference variables from another separate state. Terragrunt is an excellent open-source tool that can help in orchestrating terraform commands across multiple states for this specific use case. Another relevant feature is the terraform_remote_state data source that allows users to fetch the Terraform state file from one set of Terraform configurations to another (e.g: in case you wanted to query the subnet group from the vpc layer within the relational-db layer).
At this point you might be asking why did I decided to include the 2 folder structure screens at the top: one representing the folder structure before and the other one after? The reasoning behind this was that I wanted to illustrate the point that creating a stable terraform module requires some practice and iterations to get it right so my preference is to start defining modules in the context of a specific application or product in a modules folder, iterate it, stabilize it, and then move it to either its own repository or a repository with all the shared modules of your organization. I’ve realized that it takes time and a couple of iterations to abstract a module correctly and I prefer doing that within a product before moving it to a separate repository. Quoting Werner Vogels, CTO of Amazon Web Services: “Code can change but APIs are Forever” and this translated to Terraform means that once a module gets pusblished and starts being used by different systems it is no longer a good idea to do heavy refactoring on it.
Steps required to create the AWS cloud environment for the blog website
The following were all the steps that I followed in order to create the infrastructure to host my blogging website in AWS. You can follow similar steps and use a similar structure to the one I setup in github and you should be able to have a very similar blogging website in no time.
Part 1: Create Global Resources
Setup credentials for AWS and variables for Terraform
1
2
3$ export AWS_ACCESS_KEY_ID=(your access key id)
$ export AWS_SECRET_ACCESS_KEY=(your secret access key)
$ export TF_VAR_db_password="(YOUR_DB_PASSWORD)"Create the global Terraform resources in AWS using a local state file:
Comment out the following lines in the file:
cloud/terraform/providers/aws/global/main.tf1
2
3
4
5
6
7
8
9
10
11
12terraform {
backend "s3" {
# Replace this with your bucket name!
bucket = "terraform-blog-jv"
key = "global/s3/terraform.tfstate"
region = "us-east-2"
# Replace this with your DynamoDB table name!
dynamodb_table = "terraform-locks-jv"
encrypt = true
}
}And then execute the following:
1
2
3$ cd cloud/terraform/providers/aws/global
$ terraform init
$ terraform applySet the variable names for the global S3 bucket to store the terraform state and the dynamodb table for the locks in the file:
global/s3/variables.tfMove the local state file to a remote backend by uncommenting the previously commented lines in the file:
cloud/terraform/providers/aws/global/main.tfThen run again:
1
2
3$ cd cloud/terraform/providers/aws/global
$ terraform init
$ terraform applyAt this point you should have a terraform backend state that manages the backend resources where terraform is stored with terraform as well. The remote backend is an s3 bucket with encryption at rest and with a dynamoDB table that handles locks to avoid concurrent modifications of the backend state by different users. For enterprise use cases it is also highly recommended to enable versioning in case a terraform state file gets corrupted and you want to rollback to a previous version.
Part 2: Create Environment-specific resources
For this part we will follow the steps for the Production resources which create a public S3 bucket that is accessible via a Cloudfront distribution over https. Readers are also encouraged to look at the cloud/terraform/providers/aws/stages/staging/blog-website folder in my personal blog github repository if you just wish to create a public static bucket that can be accessible via http.
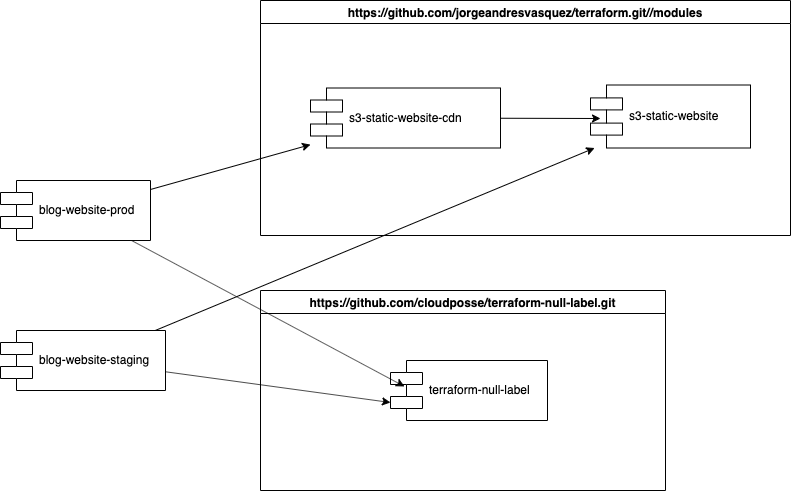
Before beginning here is a high-level overview of the different terraform modules and their dependencies:

From the image you can see how I have abstracted and moved the modules that are reusable to a terraform modules repository in order to reuse as much code as possible (following the ubiquitous DRY principle!). A very good practice is to reuse third party repositories and modules that you trust. In my case I have found that the repositories and modules maintained by this company: cloudposse on github are very mature and as an example in this case I am using one of their simplest modules (https://github.com/cloudposse/terraform-null-label) for overall consistency in my tags.
You can also notice that the dependencies between the staging and production environments are not exactly the same as for my production environment where I am using a CDN, meanwhile for my staging environment I thought that this was an overkill and decided to only use an S3 public bucket.
The steps for the creation of the prod terraform environment are the following:
Purchase a cool domain name for your blogging website. This is a manual process and since for this guide we’re using AWS the ideal is to purchase your domain name within AWS from route53. There’s also the option of transferring the domain registration into route 53. More detailed instructions can be found here:
- New domain registration in Route53: https://docs.aws.amazon.com/Route53/latest/DeveloperGuide/domain-register.html
- Transferring registration for a domain to Route53: https://docs.aws.amazon.com/Route53/latest/DeveloperGuide/domain-transfer-to-route-53.html
Provision an SSL Certificate within AWS using their Certificate Manager service (ACM).
In my case I wanted all combinations of access to my blog site to be encrypted, therefore as domain name I used:
*.thepragmaticloud.com(www.thepragmaticloud.com, prod.thepragmaticloud.com, etc.).
Be mindful that if you also wish to support the apex domain (Example:thepragmaticloud.com) you will need to include a separate domain name for this when requesting the certificate. (See: https://docs.aws.amazon.com/acm/latest/userguide/acm-certificate.html)
Also, if you have purchased your domain name via route53 in AWS then the best and easiest validation option to choose is:DNS validation
Note that it usually takes around 5 minutes to issue and validate the certificate on the AWS side even if they tell you that this can take up to 30 min.
Also there’s a fundamental requirement of cloudfront, which is that the certificate has to be requeuested in theus-east-1region (N. Virginia):To use an ACM Certificate with Amazon CloudFront, you must request or import the certificate in the US East (N. Virginia) region. ACM Certificates in this region that are associated with a CloudFront distribution are distributed to all the geographic locations configured for that distribution.
Copy paste the following folder from my github repository to your terraform blog folders:
cloud/terraform/providers/aws/stages/prod/blog-websiteand modify the terrafrom.tfvars, by copying-pasting the ACM Certificate ARN from the previous step and the parent_zone_name associated to the domain name that you decided to purchase in the first step:1
2$ terraform plan -out tplan
$ terraform apply tplanNote that the above terraform execution can take around 15 minutes so this might be a good time for a coffee.
For the impatient thes3-static-website-cdnalso supports a variable named:wait_for_deploymentthat switches off the waiting of terraform for the cloudfront distribution status to change fromInProgresstoDeployed. If you want the terraform execution to be faster just pass wait_for_deployment=false and the terraform command execution will be faster but you’ll still have to wait for cloudfront to change state in order to be able to use the Cloudfront distribution.
Terraform best practices
Finally, let’s try to recapitulate on some important terraform best practices (some of them we learned throughout this hands-on guide and some are just compilations from my experience so far using terraform):
- Create a curated library of terraform modules that can be used across your organization. Here, I tend to focus more on modules that solve common business cases present across the organization such as: Creating a static website infrastructure, creating a DB cluster that is Highly Available and has Optimal Performance, Provisioning a VPC with different private subnets and public subnets that reflect common networking patterns used in your organization (ex: public Load Balancers + private Application Servers + private RDS Datasources), etc.
- Map the folder structure to the remote state structure (this is often referred to as a WYSIWYG in the UI world and I think the same idea is also applicable within Terraform)
- Isolate, isolate, isolate! Separate the terraform state into different stages and modules of a system.
- Use tags to classify your infrastructure resources in order to be able to find support when required, control and monitor your cloud Infrastructure costs, etc.
- Here are some ideas for resource tags:
- Team (Organization team responsible for maintaining this reource)
- DeployedBy (Ex: terraform vs manually, if manually you could include the email of the person that did the change)
- Namespace (product or system to which the resource is associate)
- Environment
- ResourceName
- Here are some ideas for resource tags:
- After you start using Terraform, you should only use Terraform to manage your IaC.
- When a part of your infrastructure is managed by Terraform, you should never manually make changes to it. Otherwise, you not only set yourself up for weird Terraform errors, but you also void many of the benefits of using infrastructure as code in the first place, given that the code will no longer be an accurate representation of your infrastructure.
- If you created infrastructure before you started using Terraform, you can use the terraform import command to add that infrastructure to Terraform’s state file, so that Terraform is aware of and can manage that infrastructure.
- Note that if you have a lot of existing resources that you want to import into Terraform, writing the Terraform code for them from scratch and importing them one at a time can be painful, so you might want to look into a tool such as Terraforming, which can import both code and state from an AWS account automatically.
- Be careful with refactoring!
- Example: Changing names can lead to downtimes
- Use a create_before_destroy strategy when applicable for renaming
- If at any point you need to modify the terraform state file the recommended approach is to use the terraform CLI (specifically the
terraform statecommand)References
- Version pin all of your Terraform modules to a specific version of the global Terraform program as well as the Terraform provider
- For production-grade code, it is recommended to pin the version even more strictly:
1
2
3
4
5
6
7
8
9
10terraform {
# Require any 0.12.x version of Terraform
required_version = ">= 0.12, < 0.13"
}
provider "aws" {
region = "us-east-2"
# Allow any 2.x version of the AWS provider
version = "~> 2.0"
}
- For production-grade code, it is recommended to pin the version even more strictly:
- Use consistent naming conventions for your resources and consistent coding standards. The naming conventions can change according to the resource but at least try to include the namespace and environment consistently in there, this way whoever looks at a resource can immediately tell where is it being used.
- Like with software development in other languages you should create and maintain a document with your coding standards in Terraform.
References
- Source code associated to this article in github
- Best Coding Practices
- Drift within terraform
- MonoRepos are Awesome!
- Version Control Systems
- Recommended Way to Clean a Terraform State File
- What you see is what you get
- Terragrunt for executing commands on multiple modules
Curated list of terraform online learning resources
- Official Terraform Docs
- Terraform step by step learning guide from Hashicorp
- Terraform up and running 2nd edition
- Why we use Terraform and not Chef, Puppet, Ansible, SaltStack, or CloudFormation
- An Introduction to Terraform
- How to manage Terraform state
- How to create reusable infrastructure with Terraform modules
- Terraform tips & tricks: loops, if-statements, and gotchas
- How to keep your Terraform code DRY and maintainable:
- How to use Terraform as a team
- Installing Multiple Versions of Terraform with Homebrew
- Real world experience and proven best practices for terraform
- 5 Lessons Learned From Writing Over 300,000 Lines of Infrastructure Code
- Terragrunt: how to keep your Terraform code DRY and maintainable
- Open sourcing Terratest: a swiss army knife for testing infrastructure code
Hexo Resources
In order to test the blog website content locally run the following:
1 | $ cd blog_website |
If you want to dig deeper into Hexo here is a curated list of the Hexo resources and the theme (Icarus) being used for this blog:
- Hexo Official docs
- Icarus theme chosen for my personal blog content in Hexo
- Concise and good intro guide to hexo:
- Mike Dane’s (from Giraffe Academy’s) video guides to Hexo:
- Similar article on starting a blog using hexo and S3
Special kudos to Hashicorp for creating Terraform and for open sourcing it and creating an awesome community around it, you guys rock! And to GruntWork for doing an amazing job with devops in all aspects, with blog posts, books, open source tools, etc., One of the founders of the company: Yevgeniy Brikman is IMHO the community rockstar of Terraform!